Step by Step: pocketDial (Ctrl) --- Cubase VST 5
1) pocketEditor
a) pocketDial Settings
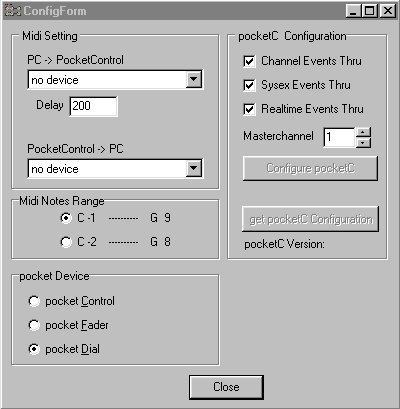
To avoid a Midi-Loop it is necessary to turn off Midi-Thru in the pocketDial.
Open the Settings Menu
Make sure that:
* the correct Midi-Devices have been selected (at least the "PC->PocketControl" device)
* pocketDial has been selected as pocketDevice
* at least "Channel Events Thru" has been unchecked
See the picture below:
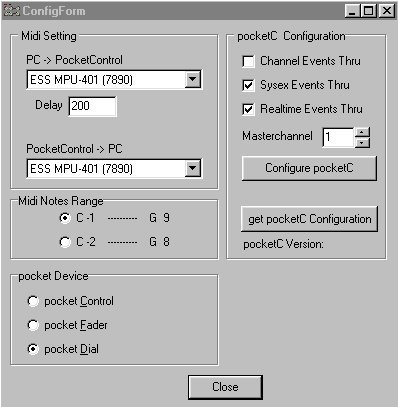
Use the "Configure pocketC" button to configure your pocketDial.
You will get a warning message stating that the editor must be used to change this setting again..
b) Create pocketDial Presets
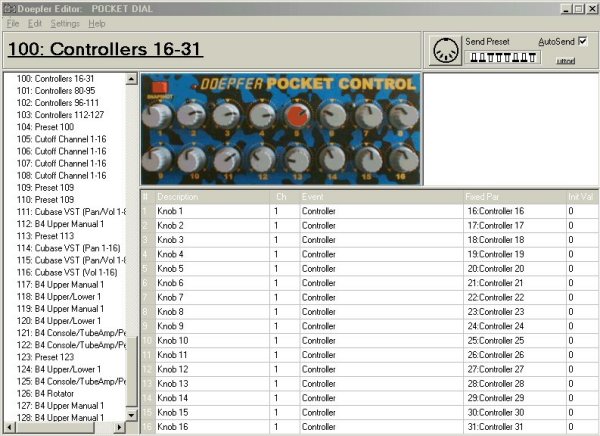
Create 4 Presets with Controller Values 16-31,80-95,96-111,112-127 and send them to the pocketDial.
(These configurations are already include in the factroy presets -> no. 10, 14, 15 ,16. They could be used as samples for these example.)
You can send all of them together, by selecting the first Preset (here Preset 100) and "Send Banks 1-4" from the context menu (or F2).
It is not necessary to use Preset 100, this is just an example.
If you want to be sure that these Presets are loaded automatically set the pocketDial Dip-Switches as indicated by the Editor.
The Picture shows the first Preset in the pocketEditor
2) Cubase VST 5
In Cubase VST open the Remote Control Dialog
Options -> Remote Control -> Settings
(the Pictures below show the german Version of Cubase VST)
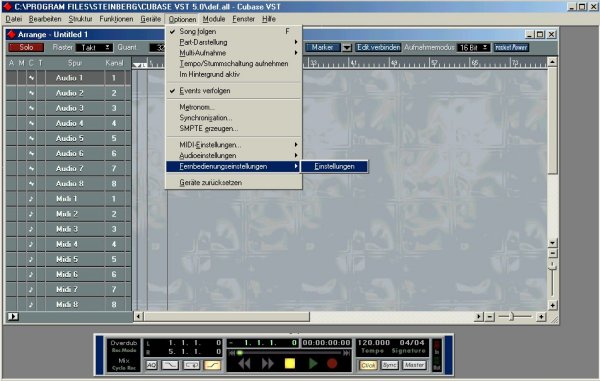
In the Remote-Control Dialog Box select Generic Remote as shown below, and select the Midi In and Midi Out ports corresponding to your pocketDial.

You need then to edit the Remote Control-Settings (select EDIT in the following window).
![]()
This will open the Generic Remote Control Settings Window.
I have created an example Configuration that you can load into Cubase (choose import and select the file pocketDial1.xml included with this tutorial).
In this window it is possible to determine what will be controlled by your pocketDial and how it will be controlled.
This is just an example, of course it is possible to create your own configurations.
Probably the best way is to use always the same Preset in the pocketDial and create (different) configurations in Cubase.
To use a different configuration, just import it into Cubase VST 5.
This is what my example Configuration controls:
Bank1:
Audio Volume 1 |
Audio Volume 2 |
Audio Volume 3 |
Audio Volume 4 |
Audio Volume 5 |
Audio Volume 6 |
Audio Volume 7 |
Audio Volume 8 |
Audio Volume 9 |
Audio Volume 10 |
Audio Volume 11 |
Audio Volume 12 |
Audio Volume 13 |
Audio Volume 14 |
Audio Volume 15 |
Audio Volume16 |
Bank 2:
Pan 1 |
Pan 2 |
Pan 3 |
Pan 4 |
Pan 5 |
Pan 6 |
Pan 7 |
Pan 8 |
Pan 9 |
Pan 10 |
Pan 11 |
Pan 12 |
Pan 13 |
Pan 14 |
Pan 15 |
Pan 16 |
Bank 3:
Low Eq On/Off |
Mid1 Eq On/Off |
Mid2 Eq On/Off |
High Eq On/Off |
Low Eq Gain |
Mid1 Eq Gain |
Mid2 Eq Gain |
High Eq Gain |
Effect Send 1 |
Effect Send 2 |
Effect Send 3 |
|
Low Eq Freq |
Mid1 Eq Freq |
Mid2 Freq |
High Eq Freq |
Bank 4:
Midi Volume 1 |
Midi Volume 2 |
Midi Volume 3 |
Midi Volume 4 |
Midi Volume 5 |
Midi Volume 6 |
Midi Volume 7 |
Midi Volume 8 |
Midi Pan 1 |
Midi Pan 2 |
Midi Pan 3 |
Midi Pan 4 |
Midi Pan 5 |
Midi Pan 6 |
Midi Pan 7 |
Midi Pan 8 |
You can immediately test it:
* Open the VST Channel Mixer 1
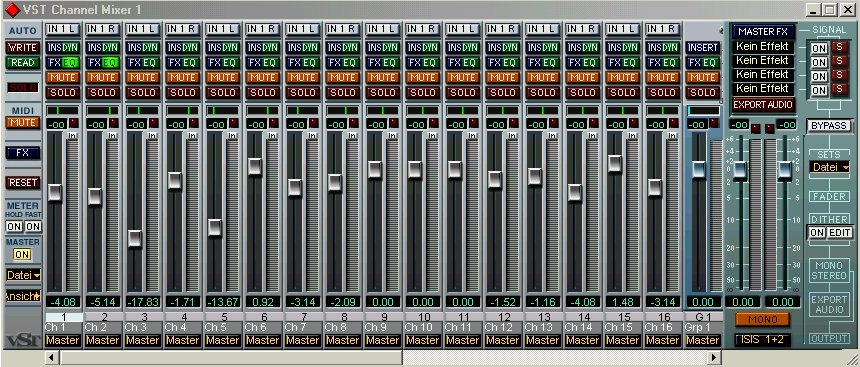
Select Bank 1 or 2 on the pocketDial to change the Volume or Panorama of the different Audio Channels.
* Open the Eq and Effect Settings Window
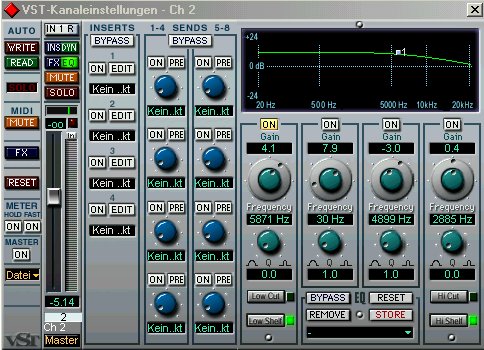
Make shure that the Channel has been selected (here Channel 2) eventually use the mouse to select it by clicking on the channel number.
Select Bank 3 to turn on/off the EQs on the selected Channel, change the Gain and Frequency Settings or control Send Level1-3
Of yourse you can switch back to Bank 1 or 2 to change Volume and Panorama settings,...
* Open the Midi Track Mixer
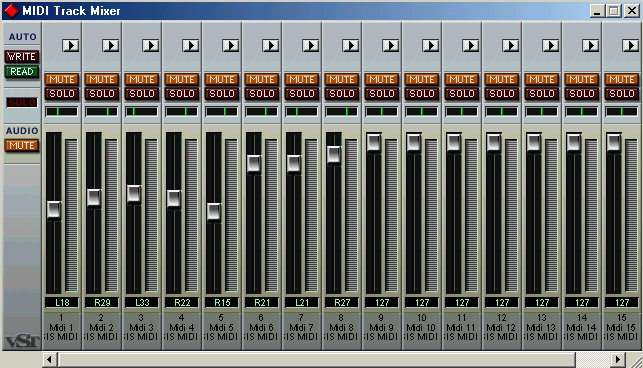
Select Bank 4 on the pocketDial to control Volume or Pan of the Midi Channels 1-8.
It is possible to move both the on-screen Knobs and Faders and the alphadials of your pocketDial without getting value jumps.
!! For this to work, Cubase must send position values to the pocketDial, therefore you must have selected the right MidiIn AND MidiOut port.
Editing the Configuration:
You can create your own configurations, depending on the functions in Cubase you want to control with your pocketDial.
Of course it is possible to use all 4 pocketDial Banks.
As an example, I will show now how to add the missing "Effect Send 4" function to Bank3.
There are two parts in the Cubase Generic Remote Editor.
The UPPER part allows you to create Control Elements and to define the Midi Command (channel, event, max value) by which they will be controlled.
The LOWER part will be used to assign Cubase actions to the different Control Elements.
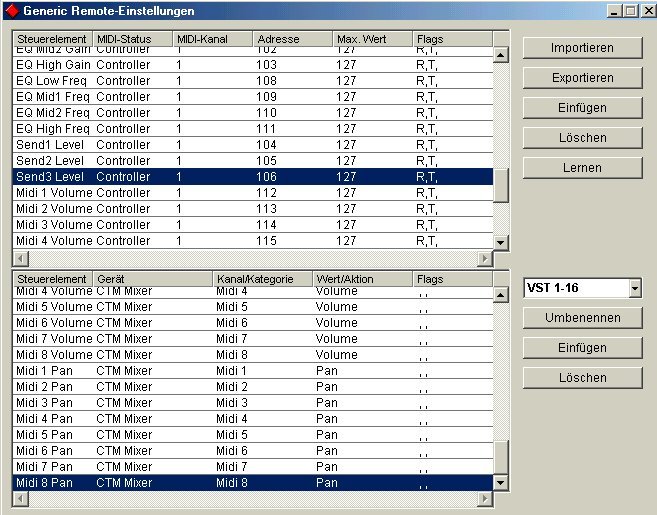
Open the Generic Remote Settings Window and use the UPPER Insert Button, scroll down in the UPPER window it should look similar to the picture below:
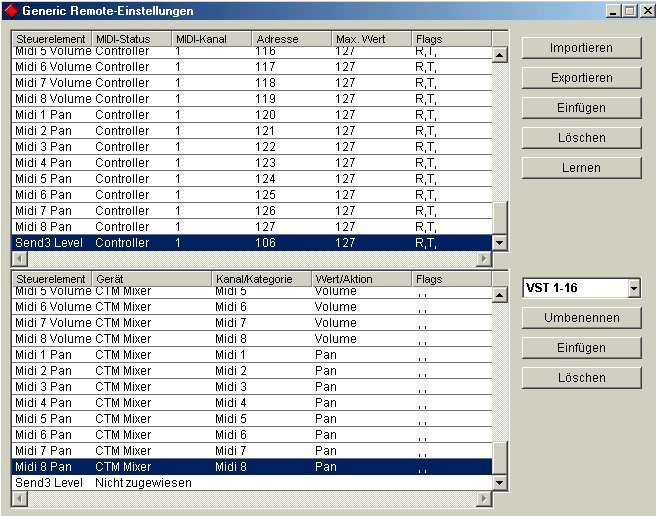
The element "Send3 Level" has been added. (This may be named differently in your window)
You can change its name (I have changed it to "Send 4 Level", see the picture below) and its parameters.
You can set the Midi parameters either manually or you can use the Learn function.
If you want to use the learn function:
* FIRST move the corresponding alphaDial on your pocketDial (here Bank 3, Dial 12)
* THEN press the Learn Button. (eventually repeat it until it changes to controller 107)
Make sure the Flags show R(eceive) and T(ransmit) !!!
The LOWER window should look like the picture below now:
(also check the settings in the UPPER window)
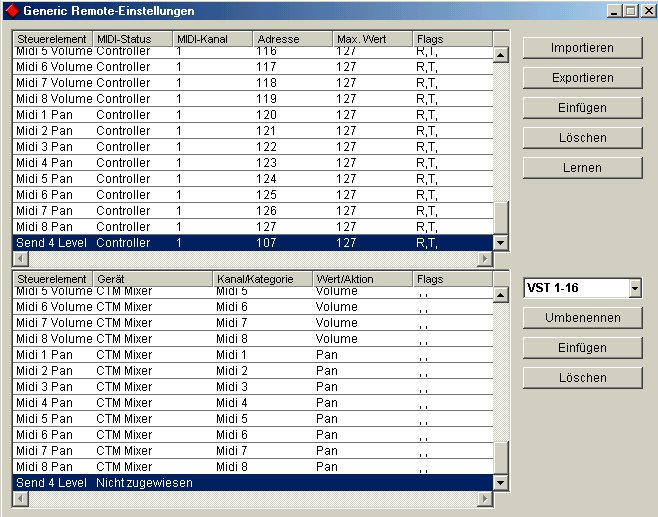
Actually the "Send 4 Level" control element is not yet associated with any Cubase function.
This must be done in the LOWER window (see the picture below)

Now Preset 3 Dial 12 will control the FX-Send 4 Level on the selected VST-Mixer channel.
(Auswahl = Selection, this means the parameter of the actually selected Channel will be controlled)
By using this procdure you can create your own configurations, depending on what you want to control in Cubase VST 5.
Up to 4x16 Control Elements can be controlled by your pocketDial.
!!! Don't forget to export (=save) your configuration!