![]()
MSY2 User's Guide
INTRODUCTION
MSY2 is an interface that converts the MIDI realtime events CLOCK, START and STOP into the corresponding signals CLOCK and START/STOP of the SYNC standard. The SYNC standard is used in vintage drum computers or sequencers such as the Roland TR808 rhythm composer or the TB303 bass line. SYNC-CLOCK is a periodic TTL signal (0/+5V) representing the tempo. SYNC-START/STOP is a signal that indicates on the 2 possible states: START = +5V, STOP = 0V. MSY2 enables the 1:1 conversion of MIDI CLOCK to SYNC CLOCK i.e. 1 MIDI clock triggers 1 SYNC clock pulse, as well as the reduction of the tempo by dividing the incoming MIDI clock frequency by an integer factor. The factor can be set to any value between 1 and 16 with 4 DIP switches. 1 corresponds to the 1:1 conversion, 16 is the maximum of frequency reduction, i.e. after 16 MIDI clocks 1 SYNC clock appears. The polarity of the CLOCK signal and the polarity of the START/STOP can be chosen by 2 DIP switches.
The SYNC standard is used with vintage sequencers or drum computers like the ROLAND TB303 or TR808. The SYNC standard uses the same type of 5 pole 180° DIN connectors as MIDI. But the standards do not fit as other pins are used and the signals are completely different! So you always have to distinguish between the MIDI and SYNC connectors.
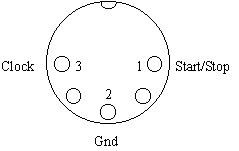
Picture 1: pinout of the SYNC connector
CONNECTIONS
MSY2 is provided with 2 SYNC connectors (parallel) for controlling 1 or 2 units equipped with SYNC inputs. The CLOCK signal is additionally available at a 3.5mm miniature jack socket to control other functions of synthesizers or drum machines like arpeggio, gate or trigger synchronized ti MIDI Clock. At the Clock socket appears the Clock signal of the SYNC connector i.e. with the same dividing factor and voltage level.
Connect MIDI IN of the MSY2 to MIDI OUT of the MIDI transmitter (e.g. MIDI sequencer, MIDI drum computer, MIDI master-keyboard) which is able to generate the MIDI real time events Start, Stop and Clock. The MIDI THRU of the MSY2 may be connected to MIDI IN of other MIDI devices (optional).
Connect one of the SYNC outputs of the MSY2 to the SYNC (-In) socket of the device to be controlled by the MSY2. The second SYNC ouput may be left open or connected to another device controlled by the MSY2 SYNC output. Use a suitable cable for that. The pins 1, 2 and 3 must be connected! MIDI cables are unsuitable! If the SYNC socket of your device can be switched between SYNC-IN and SYNC-OUT switch it to SYNC-IN (e.g. TR808). If your device is equipped with SYNC-IN and SYNC-OUT use only SYNC-IN.
If desired you may connect the Clock output jack to the control input of another device (e.g. the arpeggiator control input of a synthesizer or a drum machin with separate Clock input) to control it with a MIDI synchronized Clock signal. Use a suitable cable. Normally a cable with a 1/4" mono jack plug on one side (device) and a 3.5mm miniatur mono jack plug (MSY2) on the other side will be used.
POWER SUPPLY
MSY2 does not have a built-in power supply. It can be supplied in two different ways:
We recommend the power supply with an external AC adapter as this type of power supply will work under all circumstances. So the factory setting of the power select jumper (see below) is for external AC adapter.
If you want to supply the MSY2 via MIDI In the MIDI transmitter must correspond 100% to the MIDI standard, i.e. pin 4 of MIDI out must be connected to +5V via a resistor of 220W and pin 2 must be connected to Gnd. We found that some MIDI devices do not comply with this demand.
To check whether your MIDI transmitter is suitable for this type of power supply you have to do the following: Open the case of the MSY2 by removing the 4 screws using a suitable tool. Inside you see the pc board of the MSY2 with 2 possible jumper locations:
Picture 2: jumper location for power supply selection
One of the jumpers is located near the power supply connector. If this jumper is set the MSY2 is supplied from an external AC adapter (7...12V, 100mA minimum). This is the factory setting. If the jumper near the MIDI-In socket is set the MSY2 is supplied from MIDI (if the MIDI transmitter used is 100% MIDI compatible).
Only one of the two jumpers is allowed to be set. Otherwise the MSY2 will be damaged! If none of the two jumpers is set the MSY2 will not work.
When connecting the MSY2 to MIDI Out of the controlliung device the Clock LED must light up and remain on until the first MIDI clock event occurs. If this happens the power supply viy MIDI is possible. Otherwise the MSY2 must be supplied from an external AC adapter.
Pay attention if you open and close the MSY2 case. Use only a suitable screw driver. We cannot take back units if the case or LEDs are damaged and the warranty will be lost during such manipulations. If you are not sure whether your are able to do the modification send the unit to your local dealer or to Doepfer Musikelektronik, Graefelfing (Germany).
The external power supply (AC adapter) is NOT included with the MSY2 and must be purchased locally by the user. We recommend an VDE approved AC adapter but MSY2 will work with every AC adapter being in accordance with the following specifications. The adapter must be able to deliver 7-12 V DC unstabilized or stabilized voltage, as well as a minimum current of 100 mA. The POLARITY of the low voltage plug connected to the MSY2 must be pin = +7...12V and ring = GND (see sketch on the MSY2 housing). If the polarity is incorrect, MSY2 will not function. However, there is no danger of damage to the circuitry since it is protected by a diode. If the MSY2 is used in Germany the external power supply must be VDE approved.
When using an external power supply the MSY2 is SWITCHED ON by plugging the AC adapter into a wall outlet and connecting it to the jack labeled "9V DC" of the MSY1. There is no separate ON/OFF switch.
OPERATION
After power on (vie external AC adapter or MIDI In) the Clock LED must light up and remain on until the first MIDI clock event occurs. During this period the Clock LED works as a power indicator. If the Clock LED does not light up the AC adapter used is not suitable or does not work (or the power supply via MIDI In is not possible, see preceding chapter) or the MIDI transmitter is already sending MIDI Clock events. In the last cast you should set the MIDI transmitter to Stop mode (normally by pressing a Stop button). Most MIDI devices stop transmission of MIDI Clock events during stop mode.
In case of an incoming MIDI START event (normally followed by MIDI CLOCK signals) the START LED will light up and the CLOCK LED will flash indicating the tempo. Because of the inertia of the eye higher frequencies are not perceptible.
In case of an incoming MIDI STOP event the Start/Stop LED turns off and normally the Clock LED as well as most of the MIDI devices stop the transmission of Clock events in Stop mode. In case that the MIDI transmitter is sending Clock events in the stop mode too the Clock LED will continue flashing.
If one of the two SYNC outputs of the MSY2 is connected faultless to your device equipped with a SYNC input socket it should respond to the MIDI events, i.e. start, stop and change the tempo via MIDI. If the two LEDs of the MSY2 display properly but your device does not respond there is probably a fault in the connection between MSY2 and your device (unsuitable cable) or the SYNC input of your device is not switched to SYNC-In or the SYNC input is not in accordance with the SYNC standard.
If you want to slow down the SYNC clock frequency you may change the CLOCK DIVIDING FACTOR. The factory setting is 1:1 conversion, i.e. each MIDI Clock trigger a SYNC Clock pulse. To change the dividing factor you have change the setting of the first 4 DIP switches located at the bottom of the MSY2 case. The dividing factor can be set between 1 and 16. The valences of the 4 DIP switches are 8, 4, 2, 1 (from left to right, see pictures 3 and 4).
| DIP switch | Valence "off" | Valence "on" |
| 1 | 8 | 0 |
| 2 | 4 | 0 |
| 3 | 2 | 0 |
| 4 | 1 | 0 |
Picture 3: Valences of DIP switches for Clock dividing factor
The valence of the switches increase in the 2's power rule (1, 2, 4, 8). To obtain the resulting dividing factor you have to add 1 to the calculated value from the table above.
Example: To obtain a dividing factor of 6 you have set the switches 2 and 4 to "off" and the switches 1 and 3 to "on". This results in the valences 0+4+0+1 = 5. If you add 1 you get the resulting factor 6.
Normally you will not have to calculate the dividing factor rather you try some switch settings to find the desired SYNC clock divider. As a rule only the lower factors (1:1 ... 1:6) are making sense. You should start with the maximum Clock (i.e. dividing factor 1) and increase the dividing factor if the device controlled by the MSY2 is running too fast. Pay attention that some of the devices to be controlled by MSY2 additionally enable to change the dividing factor inside the device (e.g. TR808: "prescale"). Devices with a SYNC socket normally can be driven with the maximum speed (i.e. dividing factor 1)
The MIDI Clock is defined as 96 beats per measure. To obtain an even SYNC Clock like 32, 16 or 8 beats per measure the dividing factor must be a multiple of 3 (e.g. 96/3 = 32, 96/6 = 16, 96/12 = 8). Especially for non-SYNC applications (e.g. arpeggio of a synthesizer) you will need such even Clocks.
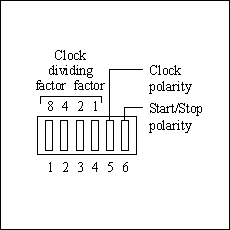
Picture 4: Location and function of the DIP switches at the bottom
The last 2 switches correspond to the polarity of Clock and Start/Stop. Normally both switches are set to "on" as this is the standard for SYNC applications (factory setting). The Clock polarity switch determines whether the falling or rising edge appears on the SYNC clock output when a MIDI clock is received. Normally this setting is of no account as the clock pulse width (i.e. the time difference between the falling and rising edge) is very small (about 4 milliseconds in the 1:1 setting). If you have the impression that there is a small time difference between your device and MIDI clock you may change the setting of the clock polarity. The Start/Stop polarity switch is used only for special applications (e.g. for drum computers with inverse Start/Stop control: 0V=Start, +5V=Stop).